
Cunning_Pam
Comorbidities, WLS, and Me
Apr 27, 2014
There was a post on one of the message boards asking what comorbidities people have had to go with their obesity. In answering, I was struck with how much improvement I've seen in my physical health since my surgery only four and a half months ago. I decided to make a blog entry here to list them, so that the information isn't lost in the normal churn of the forums. Here's what made me have surgery, along with how they affect me now:
- Diabetes (completely in remission)
- Sleep apnea (resolved)
- Hypertension (no improvement yet)
- Hip and knee pain due to osteoarthritis (generally pain free now)
- Stress incontinence (resolved)
- Peripheral neuropathy (resolved)
- GERD (resolved)
- Chronic venous insufficiency (greatly improved)
Needless to say, I'm thrilled at the results of my surgery!
Recipe - Protein Cream Apple
Apr 11, 2014
Sometimes, you just want something sweet. Or crunchy. Or sweet and crunchy. Luckily, these apples fill the bill! Once you're at a point after WLS where you can integrate some fruit into your diet, give these a try for a snack or breakfast.
Cunning Pam's Protein Cream Apple
Ingredients
1 medium apple
1 scoop Jay Robb vanilla protein powder*
1 tablespoon half and half
1 tablespoon part skim ricotta
1 tablespoon sunflower seeds
1 teaspoon hemp hearts
Method
- Cut the apple up into wedges (I got about four thin wedges per quarter apple, so about 16 slices total)
- Put the protein powder in a bowl. Add the half and half and ricotta, and stir to combine. Use the back of the spoon against the bowl to make sure the protein powder is really well mixed and not lumpy. It will take a minute or two of mixing to get it all combined and smooth.
- Stir in the sunflower seeds and hemp hearts.
- Divide the protein cream mixture into fourths.
- Dip one quarter of the apple slices into one quarter of the cream mixture for each serving.
*You could use any protein powder, but I find the Jay Robb's mixes extremely well.
Makes four servings. Here is the nutrition information from MyFitnessPal: Per serving, 76 calories, 2 grams fat, 7 grams carbs (2 of those are fiber), 7 grams of protein.
You could add 1/2 teaspoon of Torani sugar free flavored syrup to the cream mixture if you like. I added caramel, but didn't care for it. The plain vanilla was much better tasting IMO. You can also omit the hemp hearts, just adjust the nutrition information (they add about 20 calories and 1 gram protein per serving, plus a little sugar.)
Enjoy!
Recipes - Crab Stuffed Shrimp and Persian Cucumber Salad
Apr 07, 2014
Some people who have weight loss surgery, especially those people who are newly post-op, mourn the loss of tasty foods. I was certainly one of them! For a long time I felt like I would never eat anything delicious again. This was, needless to say, completely wrong! There is plenty of great tasting food out there, and all my surgery has done at this point is created a new found appreciation for well-prepared, delicious tasting food. Sure, there are plenty of foods that I will probably choose to never eat again due to the calories or carb content. But there is other food that I CAN eat, and that will be great tasting and fit into my new nutrition goals that I've set for myself.
WLS is not synonymous with deprived!
So today I was doing my regular grocery shopping today and saw these absolutely huge black tiger prawns in the seafood section. I couldn't remember the last time I had stuffed shrimp, so I decided to grab four of those bad boys and whip up some WLS-friendly yumminess! I found a recipe online that was a good starting point, but I modified it a bit to drop the carbs, fat and calories. Please note that I do not eat low fat, so I didn't substitute for the butter called for. Also note that these are not cheap to make, so consider them something to make for a special treat if you like. Above all, keep in mind that you can and will have great tasting food once again!
I put this recipe into MyFitnessPal (does anyone know if recipes you enter can be seen by others?) and the nutrition came out as follows: Per serving (one shrimp), 220 calories, 5 carbs, 9 fat, 24 protein(!), 340 sodium, 0 sugar. And believe me, one shrimp is plenty! So, here you go:
Cunning Pam's Crab Stuffed Shrimp
Ingredients
2 tablespoons butter
3 tablespoons celery, finely chopped
3 tablespoons red bell pepper, finely chopped
3 tablespoons minced shallot
1 garlic clove, minced
1/2 teaspoon fresh parsley, minced
1/4 teaspoon salt
1/4 teaspoon fresh ground pepper
1/4 cup white wine
1 (6 ounce) lump crabmeat, drained, squeezed dry and checked for shell bits
1/2 teaspoon lemon zest
1 egg
1/4 cup Ritz-type cracker crumbs (about five crackers, I pulsed them in a mini food processor until fine crumbs)
4 jumbo shrimp (about 2 ounces each) peeled and deveined, with tails on
Method
- Preheat oven to 400°F.
- In nonstick skillet, melt 2 tbsp butter over medium heat.
- Add celery, red bell pepper, shallots, garlic, parsley, and pepper.
- Cook, stirring occasionally, until just tender, 3-4 minutes.
- Add wine (or broth), cook until liquid is absorbed, about 1 minute.
- Remove from heat.
- Stir in crabmeat, zest and cracker crumbs.
- Add salt, test and adjust seasoning.
- Place shrimp on cookie sheet or in a cake pan sprayed with cooking spray.
- Mound one fourth of the crab mixture onto each shrimp.
- Sprinkle with paprika.
- Bake until shrimp are opaque and stuffing is cooked through and lightly browned, about 12 to 15 minutes. Makes four servings.
I figured that the shrimp was going to be a little rich, and could use something crisp and bright to counteract the richness. So I decided to do a quick Persian cucumber salad. Persian cucumbers are those cute little cukes you see in the supermarket packaged in bags or trays, usually about five or six per unit. They're dark green and about five inches long, and I think they have more cucumber flavor than the typical salad cuke in the supermarket. I usually just slice them up and eat them plain for a snack, but they make a nice little salad as well.
Cunning Pam's Persian Cucumber Salad
Ingredients
1 Persian cucumber, sliced thin (I used a mandoline for really thin slices)
1 teaspoon plain Greek yogurt
1/4 teaspoon dried dill
1/4 teaspoon seasoned rice wine vinegar
salt and pepper to taste
Method
Combine all ingredients and toss well. Makes two servings.
The nutrition info, per MyFitnessPal, is: Per serving, 15 calories, 3 grams of carbs, 0 grams of fat, 0 protein, 45 sodium, 1 gram sugar.
And once you put the whole thing together, it looks like this:

If there's any moral to the story, it's this: Delicious food is still on the menu! I hope you enjoy.
Photos, OH, and You
Apr 01, 2014
For many people, taking photos of their weight loss journey is an important part of the process. There's no better way to document your progress and see the outward changes in yourself, and to remind yourself how far you've come when the going gets a little rough. As members of OH, many people want to show off their progress to their online friends. This doesn't just apply to OH, of course. Those of us who use FaceBook or other social media also have the opportunity to share pictures and to get support. But I see a lot of people saying that they don't know how to resize or otherwise manipulate their photos. There are many of us who never even had to worry about pictures, since we never allowed our pictures to be taken! Well, I was one of those people too. But I've learned the value of having photos of myself, and I'm learning how to work with them so I can share them and make them a more valuable part of the permanent record of my weight loss.
I want to help people with a few simple tricks to make it easier to show off their pictures, so I'm going to do a short series of blog posts about the subject. I'll cover how to resize your pictures, crop them, add text to them, put multiple pictures together, and anything else you may want to know (and I can figure out how to do!) I'm not any kind of photography or photo manipulation professional, but the good news is, you don't have to be either! If you're reasonably proficient with a computer, you can do this too. Please note that there may be other ways to do these things, I'm just going to share the ways I've found, and I'm going to do it in as simple a way as possible.
The first step is to download GIMP. GIMP is a free - yes, that's right, FREE! - image manipulation program. Think of it as PhotoShop without the hefty price tag. You can download GIMP at www.getgimp.com. If you're more comfortable finding your own way to the site than clicking my link, just Google "download GIMP" and follow the links. Follow the installation directions and GIMP will put a shortcut on your desktop. Keep in mind that I'm working with a PC and Windows so if you are using a Mac or Linux or anything else, your process will be different. That, and I can't help you with the download or installation! 
Ok, if you're all installed, let's learn how to resize a picture.
First, open GIMP. There should be an icon on your desk from when you installed it, or you can open it however you're normally used to starting programs. You should get three windows that pop up, which look like this:
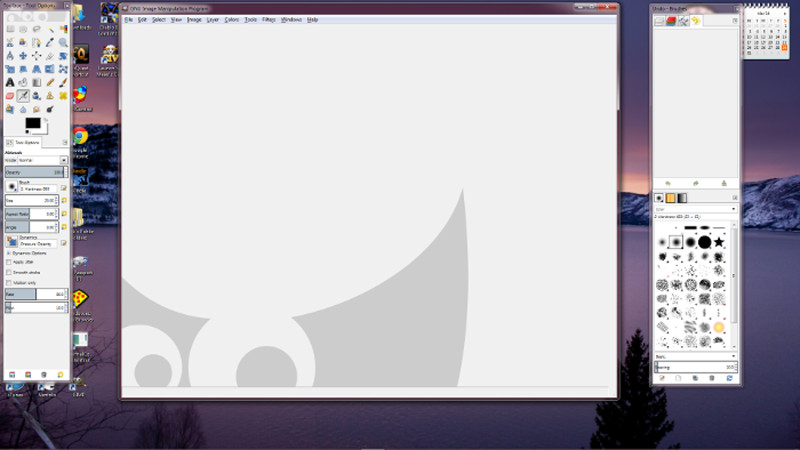
Don't panic! Yes, there's a lot of stuff there, but most of it you're not even going to worry about. We need very little of the program's abilities to do what we need here; all we're going to be concerned about is the large middle window. Now, open up the picture you want to work with: From the middle window, go to File, then Open from the drop down menu, and you'll get a box that looks like this:

Using the list of locations on the far left, navigate to where you stored your picture. You can also use the Search function at the top left to find your picture. If you notice you can click on the name of an image and you will get a small preview in the window to the right. Once you've found the picture you want, open it up by clicking the Open button at the bottom, and you'll get something like this:

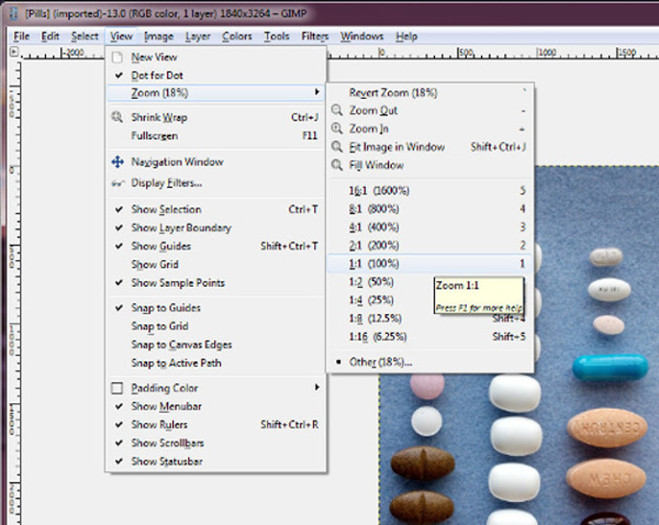
It looks pretty little, right? But looks can be deceiving! We want to see our picture at its actual size. So up on the menu bar at top, click on View, and then down in the drop down menu click on Zoom (18%) (Note that there may be another number in the space instead of 18%, just ignore that), and then from the last menu click on 1:1 (100%).
Whoa! That's HUGE!
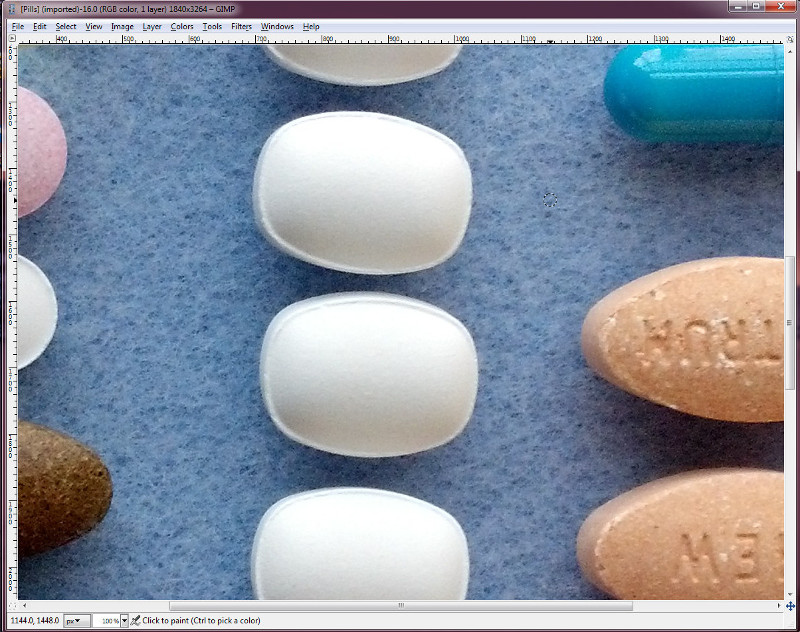
That's part of why it's hard to work with photos sometimes. Many of our cameras and cell phones are set to take big pictures at fairly high sizes and resolutions. So we're going to adjust this a bit.
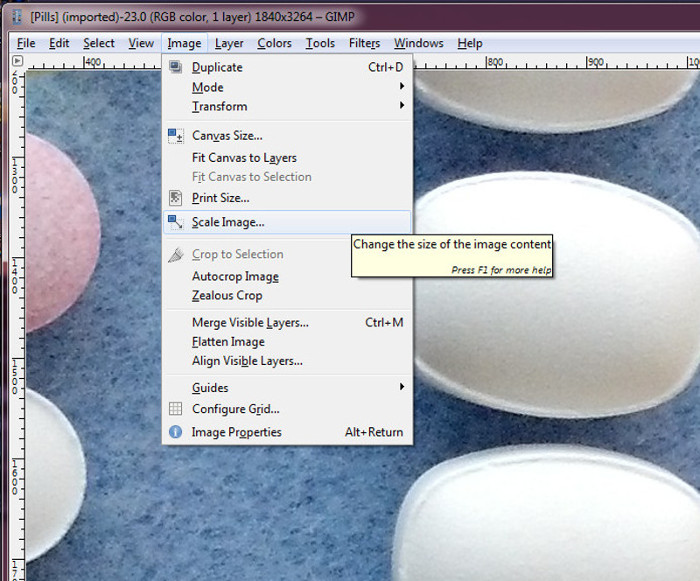
On the main menu, click on Image and then Scale Image...
And you'll get a box like this:

We're only going to be concerned about the first two lines right under the words Image Size. Right now, the program is set to display the size of the image in pixels. This particular picture is 1840 by 3264 pixels. That's immense! My monitor, for instance, is only 1920 by 1080 pixels, so that picture would be much bigger than my monitor is capable of displaying!
If you look at the Scale Image box, there's a little chain icon next to the two boxes that show the image size. If you click on it, that chain becomes broken. We want that chain intact, so click it again if you "broke" it. This will make it so that the program will automatically adjust one dimension proportionately to how you change the other dimension. If you don't adjust the size proportionately, your picture will look squashed or stretched. So, click and hold on the little down arrow to the right of either one of the pixel size numbers. You'll see the numbers start to go down, both at the same time. Go ahead and play with it, and when you think it's the size you want, hit the Scale button at the bottom of the box. The program will figure out the new size of your picture and put it on the screen. Is it still too big? Then repeat the process, starting from the Image selection from the main menu at the top. Keep adjusting the size until you think it's a good size to put on a web page. (I usually make mine no taller than 500 pixels and no wider than 600, or thereabouts. It's not science, just pick whatever looks good to you.) Tip: If you already know what size you want to make a particular dimension you can just click in the appropriate box and enter the size, rather than clicking and holding the little arrow button. Much faster.)
Once you have the image set to the new size you want, go up to the main menu again and click File, then click Export As... from the drop down box.

You'll get a new dialog box with everything you need to be able to save your picture in its new form.
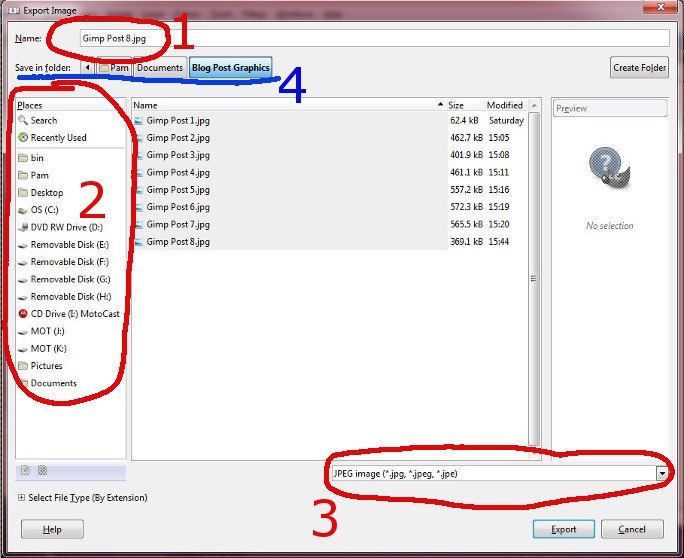
From here, you can:
1. Give your picture a new name
2. Save your picture to wherever you want to on your computer. For instance, if you have one folder for "Camera Pics" and another for "Posted Pics", you can open the ones from Camera Pics, modify them, and then save them in Posted Pics before uploading. Whatever you find easiest.
3. Save your picture to a new type of file. I recommend exporting it to a JPG (or JPEG), as that's a common and easily manipulated form. Your pictures will probably be JPGs to begin with. To select the file type, click and hold on the little down arrow and then scroll to the selection for JPG.
4. Notice in option 4 that you can see the file tree that leads to the place you're saving your picture to.
Once you've set up your picture to be saved the way you want it, click the Export button at the bottom of the window. You'll get another little dialog box pop up, which you can ignore. Just click the Export button in the new box, and voila, your picture is updated and saved!
Note that this process gives you two pictures, the original one and the new one. I like to keep the original version as a "file copy" and save the one I've worked on with a new name. This makes it so that if I want to do something different with the original picture I haven't lost anything from it.
Next time, how to rotate and crop your pictures and adding text.
Let me know if you would like to learn other things!
"I want to take fewer pills"
Mar 26, 2014
(originally posted in the General forum)
This was one of my reasons for having WLS: I wanted to take fewer pills. Well, I should have specified that I wanted to take fewer prescription pills! While I have been able to get off my diabetes medication (Metformin, two 1000 mg pills per day) here's what I currently take every day:

First row: Levothyroxine, Protonix, Simvastatin, Lotrel (all my prescription meds) Multivitamins, Krill oil, baby aspirin (approved by my WL surgeon)
Second row: Calcium, calcium and more calcium
Third row: Iron, vitamin C, vitamin C, vitamin B12, Biotin, Prunelax (senna laxative, not every day), probiotic pearl.
And this doesn't include the Doxycycline I was put on yesterday for my rosacea!
Generally, it's my understanding that sleevers take fewer pills, and DSers may have to take more. This isn't vitamin wars, I just thought it would be interesting to see a visual of my daily meds/supplements routine and that maybe some newcomers may find it interesting. At first, I didn't know how I would ever fit all these in in one day! And figuring out when to take which with which, and how long to separate what from what was challenging. It's fast becoming second nature, though. I bought six pill containers from Walgreens that have three slots each, and I load them all up ahead of time so that I can pop one open and easily see what I still have to take on any given day.
I hope this is educational/entertaining!
Total Loss at Three Months: 75 Pounds
Mar 22, 2014
Holy mackerel. I've lost a lot more than I was expecting to! At the three month mark, and counting the weight I lost on the pre-op diet (Yes, it counts IMO!) I've dropped 75 pounds. SEVENTY FIVE! That's an amazing number to me, and I'm just thrilled with it! Now, I realize that the rate of loss will not stay that high forever, but I'm certainly going to enjoy it in the meantime. Someday, when it gets harder and harder to lose the last little bits until I reach goal, I'm going to be able to look back and see just what a great start I had, and remember that a great start just means it's that much more important to finish strong.
That loss comes with very minimal exercise, as well. While I'm convinced that weight loss comes more from the amount and type of food we eat, I'd still like to add in exercise to tone and shape. In addition, I like the way my body feels now, and I can see that it will feel even better if it's stronger and healthier. So, next stop on the journey: finding an exercise program I can stick with.
Three Months Out, 10 Years Lost
Mar 22, 2014
(Originally posted to the RNY forum, reprinted here.)
Hey all! I decided to take a break from posting here for a while, and I still don't think I'm ready to come back just yet. However, I do read every day, and I really enjoy hearing about everyone's successes. I even enjoy hearing people's questions and problems, because I learn from everything, and I appreciate everyone who's confident and/or vulnerable enough to post those things.
I do want to post this, however, and hope that it can inspire someone somehow. I hit my three month surgiversary on the 18th of March, and I couldn't be happier with how things are going so far. While I fully realize that this is the "honeymoon" period, I'm enjoying the chance to revamp my relationship with food and improve my health. I now weigh less than I have in 22 years, fit in clothes that are three sizes smaller than when I started this process, and feel SO much better physically and mentally! It's been very surprising to me to learn that I can actually be disciplined and stick with a program, thanks to my newly rerouted guts.  It's going to get harder, but I'm taking the time to develop the habits and mindset that I'll need to keep fighting and get to goal and maintain. Only time will tell, but for the first time in my life I feel confident and optimistic about the future. Yay!
So currently, I'm keeping calories at 700 or under, carbs at 30 or under (most days less than 20), and protein at 80 or above. Water is coming in between 80 and 100 ounces a day, I have a solid vitamin regimen and am weighing and measuring religiously. I'm not doing much in the way of exercise yet, since dealing with a stricture took more effort than I'd anticipated and I wanted to make sure my food/liquids and supplementation routines were solid. I'm currently walking 30 minutes a day and looking into which gym or exercise program will be a good fit for me (translation: something I can stick with!)
The title of the post refers to my feelings today as I looked in the mirror and the attached picture of me pre-op and now. Due to the wonderful hair loss which started this week with a bang (Ever seen a husky blowing coat? Yeah, that bad), I got a new style to try to minimize the appearance of the thinning hair. Even my husband, who begged me not to cut my hair, says I look ten years younger in the picture. Eh, it may not be a whole ten years, but I definitely look younger! And happy. I was happy to take a picture of myself, amazingly enough! Me, who always used to dodge cameras.
So, thank you again to all who post here, and keep on keeping on!

Yay, I'm Morbidly Obese!
Jan 16, 2014
No, no, this is a GOOD thing! Allow me to explain: As of today, my BMI is 49. This drops me below the threshold from being Super Morbidly Obese to just plain Morbidly Obese!
Hey, I'll take any progress I can get.